$dom = new DOMDocument();
$dom->loadHTML($data['description']);
$images = $dom->getElementsByTagName('img');
foreach ($images as $image) {
$old_src = $image->getAttribute('src');
$new_src = 'image/products/newimage.jpg';
$image->setAttribute('src', $new_src);
$image->setAttribute('data-src', $old_src);
}
$data['description'] = $dom->saveHTML();
Web, Software and Graphics
Add php 8 to ispconfig
if you dont have any additional php versions on your ispconfig follow this tutorial first. https://www.howtoforge.com/tutorial/how-to-install-php-7-for-ispconfig-3-from-debian-packages-on-debian-8-and-9/
Go to settings – Additional PHP Versions
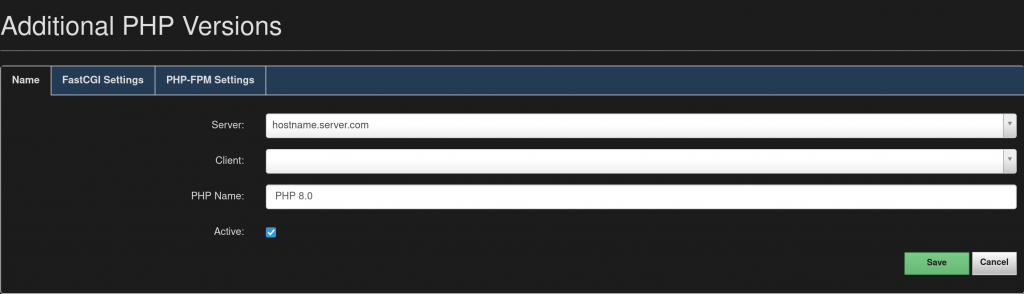
Path to the PHP FastCGI binary: php-cgi8.0
Path to the php.ini directory: /etc/php/8.0/cgi/php.ini
Path to the PHP-FPM init script: php8.0-fpm
Path to the php.ini directory: /etc/php/8.0/fpm/php.ini
Path to the PHP-FPM pool directory: /etc/php/8.0/fpm/pool.d
Once you added the values
Log into your terminal and install the new php
apt-get install php8.0 php8.0-cli php8.0-cgi php8.0-fpm php8.0-gd php8.0-mysql php8.0-imap php8.0-curl php8.0-intl php8.0-pspell php8.0-sqlite3 php8.0-tidy php8.0-xmlrpc php8.0-xsl php8.0-zip php8.0-mbstring php8.0-soap php8.0-opcache libonig5 php8.0-common php8.0-readline php8.0-xml
As of php 8, the only extension not used before that is included is php8.0-json
Set Debian default PHP back to the original version
The lastest ispconfig (3.2.5) uses 7.3 so that is what will select
update-alternatives --config php
update-alternatives --config php-cgi
service php7.3-fpm restart && service php7.4-fpm restart && service php8.0-fpm restart
Securing your ISPConfig 3 managed mailserver with a valid Let’s Encrypt SSL certificate (certbot)
You can normally just name your server something nice in the beginning of the install but i recommend to proceed this route as works better once you start scaling your servers and add multiple email servers.
Under Sites, click “Add new website”. Set mail.example.com as domain. Disable Auto-Subdomain, and check the Let’s Encrypt checkbox.
After this you can add your other hostnames as alias domains, by going to the aliasdomain list and clicking
“Add new aliasdomain”. Select smtp.example.com as domain, and mail.example.com as parent website.
With this will be able to have clients login into gmail smtp using this domain or if they want to pay extra you can create one specific for their company domain like mail.domain.com
Disable Auto-Subdomain and save the new record
Verify that the certificate is in place. You can do this with a tool like https://www.sslshopper.com/ssl-checker.html
Replacing the certificate with the Let’s Encrypt certificate
All your doing here is using the ssl you created in ispconfig to now be used by postfix – you can also buy an ssl and paste the values in the ispconfig. ( From testing my email servers on multiple sites the ssl dont matter just as long as the handshake etc… matches so the free one works fine no need to spend money)
cd /etc/postfix/
mv smtpd.cert smtpd.cert-$(date +"%y%m%d%H%M%S").bak
mv smtpd.key smtpd.key-$(date +"%y%m%d%H%M%S").bak
ln -s /etc/letsencrypt/live/mail.example.com/fullchain.pem smtpd.cert
ln -s /etc/letsencrypt/live/mail.example.com/privkey.pem smtpd.key
systemctl restart postfix
systemctl restart dovecot
Set up a automatic renewal script
nano /etc/init.d/le_mailserver_restart.sh

Paste this in that file (replace mail.example.com with the hostname you used):
#!/bin/sh
### BEGIN INIT INFO
# Provides: LE MAILSERVER CERT AUTO UPDATER
# Required-Start: $local_fs $network
# Required-Stop: $local_fs
# Default-Start: 2 3 4 5
# Default-Stop: 0 1 6
# Short-Description: LE MAILSERVER CERT AUTO UPDATER
# Description: Restart mail server automatically when a new Let's Encrypt certificate is issued.
### END INIT INFO
systemctl restart postfix
systemctl restart dovecot
apt install incron
chmod +x /etc/init.d/le_mailserver_restart.sh
echo "root" >> /etc/incron.allow

incrontab -e

Add this (again, replace mail.example.com with the hostname you used) to the file:

/etc/letsencrypt/archive/mail.example.com/ IN_MODIFY /etc/init.d/le_mailserver_restart.sh
Access Ionic App App from Virtual Box Server Using Nat Adapter and Bridge
ionic serve --external --host=0.0.0.0 --port=8132
or
ng run app:serve --host=0.0.0.0 --port=8132
replace 0.0.0.0 with your ip and the port number as well
Dont Forget to add Port forwarding
Apache Reverse Proxy for Docker Website or App in Ispconfig
Create a domain in ispconfig how your normally would with ssl
make sure you have proxy http enabled
sudo a2enmod proxy_httpServerName domain.com
ProxyPass /.well-known !
ProxyPass “/” “http://DockerIp:DockerPort/”
ProxyPassReverse “/” “http://DockerIp:DockerPort/”
RedirectMatch ^/$ https://domain.com
SSLEngine on
SSLCertificateFile /etc/letsencrypt/live/domain.com/cert.pem
SSLCertificateKeyFile /etc/letsencrypt/live/domain.com/privkey.pemReplace http://DokcerIp:DockerPort/ with your info
domain.com with your domain or sub domain name
Install LAMP (Linux Apache Mysql PHP) Web Server on Raspberry Pi
Install Apache
- Open a terminal window by selecting Accessories > Terminal from the menu.
- Install the
apache2package by typing the following command into the terminal and pressing Enter:
sudo apt-get install apache2 -yGo to your host name or ip for example mine is http://quepaso and apache
if you dont know your ip do – ip a on the terminal.
Install Apache
sudo apt-get install php -ycreate a php file to test
cd /var/www/clients/client2/web10/web
sudo nano index.php
<?php phpinfo(); ?>
sudo service apache2 restart
Install MariaDB
sudo apt-get install mariadb-server php-mysql -y
sudo mysql_secure_installation
sudo service apache2 restartInstall skype manjaro or arch linux
cd ~/Downloads
git clone https://aur.archlinux.org/skypeforlinux-stable-bin
cd skypeforlinux-stable-bin
makepkg -siInstall slack manjaro or arch linux
cd ~/Downloads
git clone https://aur.archlinux.org/slack-desktop.git
cd slack-desktop
makepkg -siSet Manjaro Time
Step 1: Install NTP

sudo pacman -S ntp
Step 2: Turn on NTP

sudo timedatectl set-ntp true
WordPress Transfer MySql Queries
UPDATE wp_options SET option_value = replace(option_value, 'http://www.oldurl', 'http://www.newurl') WHERE option_name = 'home' OR option_name = 'siteurl';

UPDATE wp_posts SET guid = replace(guid, 'http://www.oldurl','http://www.newurl');

UPDATE wp_posts SET post_content = replace(post_content, 'http://www.oldurl', 'http://www.newurl');

UPDATE wp_postmeta SET meta_value = replace(meta_value,'http://www.oldurl','http://www.newurl');
Command Line
mysql -u root -p databasename
mysql> UPDATE wp_options SET option_value = replace(option_value, 'http://www.oldurl', 'http://www.newurl') WHERE option_name = 'home' OR option_name = 'siteurl';
mysql> UPDATE wp_posts SET guid = replace(guid, 'http://www.oldurl','http://www.newurl');
mysql> UPDATE wp_posts SET post_content = replace(post_content, 'http://www.oldurl', 'http://www.newurl');
mysql> UPDATE wp_postmeta SET meta_value = replace(meta_value,'http://www.oldurl','http://www.newurl');
Deactivate all plugins mysql or wp cli
UPDATE wp_options SET option_value = '' WHERE option_name = 'active_plugins';For Cli
wp plugin deactivate --allInstall Node and Npm Debian Buster 10 Ispconfig Jailkit
For Latest Release
sudo apt-get install curl software-properties-common
curl -sL https://deb.nodesource.com/setup_14.x | sudo bash -
For LTS Release
sudo apt-get install curl software-properties-common
curl -sL https://deb.nodesource.com/setup_12.x | sudo bash -

update jailkit

[node]
comment = NodeJS
paths = npm, node, nodejs, /usr/lib/nodejs, /usr/share/npm, /usr/share/node-mime, /usr/lib/node_modules, /usr/local/lib/nodejs, /usr/local/lib/node_modules, elmi-to-json, /usr/local/bin/elmi-to-json
executables = /usr/bin/npm, /usr/bin/node, /usr/bin/nodejs
directories = /usr/lib/node_modules
Update shell user or create a new one
jk_init -c /etc/jailkit/jk_init.ini -f -k -j /var/www/clients/client1/web1 node
For the final step, update the system -> server config and add node in (Jailkit chroot app sections)
Now you can let your clients use node or npm as a shell user
npm installDrupal 8 Ispconfig Nginx directives
 location ~* \.(engine|inc|info|install|make|module|profile|test|po|sh|.*sql|theme|tpl(\.php)?|xtmpl)$|^(\..*|Entries.*|Repository|Root|Tag|Template)$|\.php_ {
                deny all;
       }
       location / {
                try_files $uri $uri/ /index.php?$args;
       }
       location ~*  \.(jpg|jpeg|png|gif|css|js|ico)$ {
                expires max;
                log_not_found off;
       }
Convert Virtual Box OS to Virtual Machine Manager
Go to the location of your vdi and convert it. Do not export your appliance
qemu-img convert -f vdi -O qcow2 vbox-machinename.vdi kvm-machinename.qcow2
Go to virtual machine manager and import.
Nextcloud ISPConfig3 Debian Buster Nginx
In the PHP directives in ISPConfig3
upload_max_filesize=20g
post_max_size=20g
always_populate_raw_post_data=-1
max_execution_time = 3600
In ISPConfig3, insert the following in the nginx directives
# Add headers to serve security related headers
# Before enabling Strict-Transport-Security headers please read into this
# topic first.
#add_header Strict-Transport-Security "max-age=15768000; includeSubDomains; preload;" always;
#
# WARNING: Only add the preload option once you read about
# the consequences in https://hstspreload.org/. This option
# will add the domain to a hardcoded list that is shipped
# in all major browsers and getting removed from this list
# could take several months.
add_header Referrer-Policy "no-referrer" always;
add_header X-Content-Type-Options "nosniff" always;
add_header X-Download-Options "noopen" always;
add_header X-Frame-Options "SAMEORIGIN" always;
add_header X-Permitted-Cross-Domain-Policies "none" always;
add_header X-Robots-Tag "none" always;
add_header X-XSS-Protection "1; mode=block" always;

# Remove X-Powered-By, which is an information leak
fastcgi_hide_header X-Powered-By;

# Path to the root of your installation
root {DOCROOT};

location = /robots.txt {
   allow all;
   log_not_found off;
   access_log off;
}

# The following 2 rules are only needed for the user_webfinger app.
# Uncomment it if you're planning to use this app.
#rewrite ^/.well-known/host-meta /public.php?service=host-meta last;
#rewrite ^/.well-known/host-meta.json /public.php?service=host-meta-json last;

# The following rule is only needed for the Social app.
# Uncomment it if you're planning to use this app.
#rewrite ^/.well-known/webfinger /public.php?service=webfinger last;

location = /.well-known/carddav {
 return 301 $scheme://$host:$server_port/remote.php/dav;
}
location = /.well-known/caldav {
 return 301 $scheme://$host:$server_port/remote.php/dav;
}

# set max upload size
client_max_body_size 20G;
fastcgi_buffers 64 4K;

# Enable gzip but do not remove ETag headers
gzip on;
gzip_vary on;
gzip_comp_level 4;
gzip_min_length 256;
gzip_proxied expired no-cache no-store private no_last_modified no_etag auth;
gzip_types application/atom+xml application/javascript application/json application/ld+json application/manifest+json application/rss+xml application/vnd.geo+json application/vnd.ms-fontobject application/x-font-ttf application/x-web-app-manifest+json application/xhtml+xml application/xml font/opentype image/bmp image/svg+xml image/x-icon text/cache-manifest text/css text/plain text/vcard text/vnd.rim.location.xloc text/vtt text/x-component text/x-cross-domain-policy;

# Uncomment if your server is build with the ngx_pagespeed module
# This module is currently not supported.
#pagespeed off;

location / {
   rewrite ^ /index.php;
}

#location ~ ^\/(?:build|tests|config|lib|3rdparty|templates|data)\/ {
location ~ ^\/(?:build|tests|config|lib|3rdparty|templates)\/ {
   deny all;
}
location ~ ^\/(?:\.|autotest|occ|issue|indie|db_|console) {
   deny all;
}

location ~ ^\/(?:index|remote|public|cron|core\/ajax\/update|status|ocs\/v[12]|updater\/.+|oc[ms]-provider\/.+|.+\/richdocumentscode\/proxy)\.php(?:$|\/) {
   fastcgi_split_path_info ^(.+?\.php)(\/.*|)$;
   set $path_info $fastcgi_path_info;
   try_files $fastcgi_script_name =404;
   include fastcgi_params;
   fastcgi_param SCRIPT_FILENAME $document_root$fastcgi_script_name;
   fastcgi_param PATH_INFO $path_info;
   fastcgi_param HTTPS on;
   # Avoid sending the security headers twice
   fastcgi_param modHeadersAvailable true;
   # Enable pretty urls
   fastcgi_param front_controller_active true;
   fastcgi_pass php-handler;
   fastcgi_intercept_errors on;
   fastcgi_request_buffering off;
}

location ~ ^\/(?:updater|oc[ms]-provider)(?:$|\/) {
   try_files $uri/ =404;
   index index.php;
}

# Adding the cache control header for js, css and map files
# Make sure it is BELOW the PHP block
location ~ \.(?:css|js|woff2?|svg|gif|map)$ {
   try_files $uri /index.php$request_uri;
   add_header Cache-Control "public, max-age=15778463";
   # Add headers to serve security related headers (It is intended to
   # have those duplicated to the ones above)
   # Before enabling Strict-Transport-Security headers please read into
   # this topic first.
   #add_header Strict-Transport-Security "max-age=15768000; includeSubDomains; preload;" always;
   #
   # WARNING: Only add the preload option once you read about
   # the consequences in https://hstspreload.org/. This option
   # will add the domain to a hardcoded list that is shipped
   # in all major browsers and getting removed from this list
   # could take several months.
   add_header Referrer-Policy "no-referrer" always;
   add_header X-Content-Type-Options "nosniff" always;
   add_header X-Download-Options "noopen" always;
   add_header X-Frame-Options "SAMEORIGIN" always;
   add_header X-Permitted-Cross-Domain-Policies "none" always;
   add_header X-Robots-Tag "none" always;
   add_header X-XSS-Protection "1; mode=block" always;

   # Optional: Don't log access to assets
   access_log off;
}

location ~ \.(?:png|html|ttf|ico|jpg|jpeg|bcmap|mp4|webm)$ {
   try_files $uri /index.php$request_uri;
   # Optional: Don't log access to other assets
   access_log off;
}